ZEE TALKIES HD
NEW MARATHI MOVIE HD CHANNEL
STARTED TEST SIGNAL FROM
Parameter Details:
Satellite Intelsat20@68.5E(C-Band)
Freq Rate 3810
Symbol Rate 15000
Polar Vertical
Modulation HD.MPEG4/DVB S2
Mode Pay/Conex
Ayurveda Tv channel test transmission was
starting on IS 17
TP : 3946 v 27691.
1yes Tamil channel is started on IS-17
TP : 3877 H 14299
Dish Tv :
4 TEST Channels are now added in testing on
Dish tv on new frequency 11750 V 29500,
DVB S mode.
Recently , there are not come in stb but it
will soon add by next few days.
ABS Free Dish :
These are channels removed from 12227 H
44000 frequency on ABS 2.
ZONET
Peace Of Mind
Samaya TV
Nepal 1
These are channels removed from 12227 H
44000 frequency on ABS 2.
The four free-to-air (FTA) TV channels are
Win TV (Tamil), Win TV (UP), Cuisine TV and
Aaseervatham TV. Out of these, two are
discontinued and the plan is to relaunch
them soon. The company is planning to
revamp Win TVUP, which caters to news and
current affairs in the state of Uttar Pradesh,
and Cuisine TV, which caters to food and
culinary.
Dd Free Dish :
Doordarshan has set in motion the process of
rolling out encrypted MPEG 4 set-top boxes
(STB) for its free DTH service Freedish.The plan
is to roll out MPEG 4 STBs within four months.
It will start with 24 channels and then add
capacity in phases. DD Freedish will also get
additional transponders to expand the
service.The pubcaster has floated tender for
appointing authorised STB original equipment
manufacturers (OEMs).“We have issuedtender
for rolling out MPEG 4 STBs. We hope to roll
out MPEG 4 STBs in 3–4 months. The MPEG 4
STBs will have 24 channels to be with. We will
add capacity in phases,” Doordarshan deputy
director general (DTH) AK Jha.
The authorised OEMs will sell Doordarshan-app
roved CAS and firmware/middleware-enabl
edSTBs. The e-application was issued on 20
September, while the e-application will open
on 25 October.The delivery period of STB is
three months. A pre-bid conference for the
tender will be held in Doordarshan Bhawan on
2 October.The target is to provide 250
channels through theMPEG 4 STBs. Freedish
will also get additional transponders for
expanding its service. “We will get additional
transponders for providing 250 channels.
Currently, we have six transponders,” Jha
added.
Basically we making bootable disk for booting but there is another why toboot your PC. This is USB drives, making bootable pendrive is not difficult. And there is lots of tool to make USB drive but some time they can’t make bootable but I show you how to make a bootable USB pendrive by cmd. Command prompt only accept commands that why everyone think that was very difficult. But I clearly tell you creating USB pandrive using cmd is not hard.
How To Make A Bootable USB pendrive:
First of all download windows Image which you want to install in your pc.
After it insert USB stick, now go to start ->> all programs ->> Accessories ->> select command prompt, right click on it and “run as administrator”. Now cmd will be display and enter the following commands…
Now enter diskpart ->list disk -> select disk 1 (chose the USB drive which you inserted into your pc)
This is my another how to guide, I hope this is helpful for you. this is Awesome way to make a bootable USB pendrive using command prompt.If you like my article please subscribe our newslater and get more awesome computer tricks and tips. And also share our article with your friends on Facebookandgoogle plus. If you have any quarry related this article comment below and I resolve it very soon.
Nowadays so many fake activator are there on online and outdated. If you want key without purchasing it. You can use my 100% working crack. This is permanently activate windows 8.1 pro and enterprise RTM version after installing windows 8.1. I am also using these tool to activate my windows and its free . I am giving you proper guide how to activate windows 8.1 by activator. If you want this to get free license key and save your pocket money then continue reading…
How to activate windows 8.1
Feature of activator:
It permanently activating your product key.
User friendly interface with simple option.
Support offline and online activation its means no needs to disconnect internet connection.
Activating both operating system like 32 bit and 64 bit.
I gave you step by step guide to proper way to use this key generator to get free key and use the all features of windows 8.1 pro and enterprise see below –
Now open the .rar file and extract it and open KMSAutoEasyEN.exe.
Now you can see KMS auto easy setup open and now menu displayed and now chose the 1 option Activate windows.
It’s take few seconds and after processing complete the KMS auto easy setup screen background color will be appear green and red. If background color was green its means product successfully activated and else red mean not yet activate. See below image –
You can see the windows is activated massage in property tab.
Watch This Video For More Info -
Final words!
I hope you enjoy this post how to activate windows 8.1 crack and you returning on my blog to see more free stuff. I always finding some free stuff to help my reader to save money and time . Because everyone wants free stuff I also like free software and key to use full version of software and operating system. If you have any query or problem comment below and I will help you very soon. Thanks for visiting
Windows 8.1 is new upgraded version of windows 8 and think this is awesome you can easily install it by DVD or USB drive. You can easily install Windows 8.1 from USB drive. New windows have lots of new features like new app store, new start menu also multiple tasking window.
Now a days no one want to install optical devices in our Pc and also tablets have not optical DVD writer in build. Then if you are tablet user then this is awesome post for you and also desktop and laptop user use this trick to same Wasting money on CD/DVD.
Before installing win 8.1 in your PC please read system requirement to understand. This OS support your Pc or not. See below system requirement –
System Requirements:-
Processor: Intel Dual core (upto 1 GHZ ) or higher.
Ram: 1GB ram (32 bit), 2 GB (64 bit) minimum.
Hard Dick: 16 GB (32bit), 20GB (64 bit).
Graphic Card: DX 9 graphic cards with WDDM drivers.
[yellowbox]Note:- If you have 2GB Ram then install 32bit OS and if you have 2 above RAM then install 64bit OS[/yellowbox]
How To make Bootable USB:
Before starting installing in your PC make you bootable USB. There is three method to make you bootable pan drive. All method are very easy don’t worry about it.
Method #1 : This is very simple method. Just follow simple steps –
Download PowerISO Software.
Insert pan drive in your PC.
Now Select downloaded windows 8.1 ISO image and right click on it. After that just click on PowerISO and then extract to.
Then you can see “Extract” wizard is open now just browse your file and click ok.
After 10-15 your USB drive will bootable.
Method #2 : this is second method if first method doesn’t works please apply this method.
Open PowerISO Software.
Now click on tools and in tool section click on “create bootable USB drive”.
Now powerISO want administrator permission. Click on OK.
Now new wizard is opened, First select ISO image file which want.
Then select pan drive. After it click on start button.
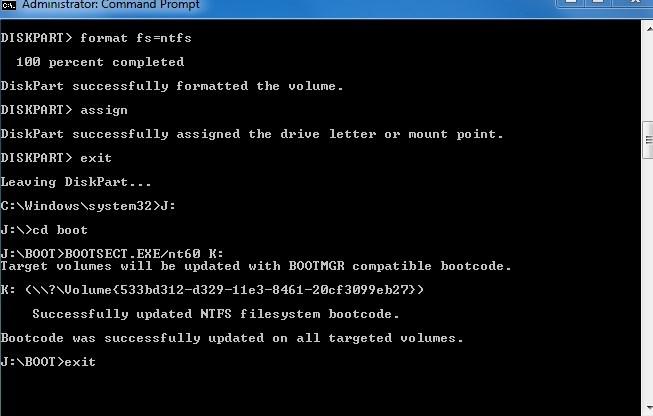
Method #3 : If both of method doesn’t working then take this method. This is CMD method. Some pan drives are not able to make bootable. But this method will make it bootable. After doing this method just do first method.
How to make a bootable USB pendrive using CMD
After doing all those things. Now you are ready for install windows 8.1 by USB. Continue reading –
How To Install Windows 8.1 From USB:
1. First of all Insert you pan drive in pc.
2. Now restart your pc and boot from USB.
3. After its automatically boot.
4. Now windows setup wizard appears now hit on Next button and after it click on “Install”.
5. Now accept the license and Hit Next.
6. Select “custom: Install windows only (advance)” option.
7. Now select your partition where you want to install windows. Just Format it and then select it and hit next.
8. After it. Setup will be taking 10 to 15 minutes for processing.
9. After completing the process Pc automatically restarted. Now windows getting started and installing drivers for your pc and its take 3-5 minutes.
10. Now personalize option appears. Now select theme color of your windows. Also enter your PC Name and Hit next button.
11. Click on “use express settings”.
12. Now it’s asking for Microsoft account. If you have Microsoft account then enter your email and password. If you haven’t account then click on “create a new account” and click next.
13. Now enter your verification which Microsoft sending you on mobile.
After doing all that your windows installing is completed. Now one more thing is remaining. What is that? Do you know that? This is activating you windows continue read to know how you activate your product.
How To activate Windows 8.1 (Free):
There are lots of way to activate windows 8.1 easily. But I’m using new type of activator. In this activator you can activate you Microsoft office 2013 also After installing please activate it to click on this link –Activate windows 8.1 By activator
For More Info Watch This Video -
Final Words!
This is very easy way for those people who don’t want to format there PC by DVD. you can easily make bootable pandrive and install any OS by these method. I personally said that if you install any OS by USB you can see that its install very fast. THis is best gudie on how to install windows 8.1 from USB drive. If you like my this post please share it on Facebook, Google+. and if you getting any problem then comment.
Whatsapp is a messaging service used to send sms, images and videos and more.We share photos, videos and audio on whatsapp and all that shows up in our phone's gallery and music player. And lets assume Most of the pictures and videos that we recieve on whatsapp aren't really we don't want to show up in our gallery.
" We receive so many images and videos on whats app and some times we recieve some private images or videos or audios and we don't want to show them all in gallery ......"
So deleting those images and videos is one option to get ridof them from your Gallery. But since that would be time consuming and hence not worth the effort, a better solution would be to stopwhatsappphotos and videos from showing up in your phone’s gallery.
HOW TO REMOVE WHATSAPP PHOTOS AND VIDEOS FROM GALLERY
To block whatsapp media from appearing in Gallery we’ll create file named .nomedia the whatsapp directory on your phone.
What’s a .nomedia file? A .nomedia file on Android is used to restrict apps from accessing media files present in a folder. When a folder has .nomedia file present inside it, Gallery and other similar apps will reject the contents of that folder and hence not index them.
So if we create a .nomedia file inside the whatsapp directory, the Gallery on your phone would reject the photos and videos that present in Whatsapp and hence won’t show them.
Follow the below mentioned steps :
For this step you need to have a file explorer installed in your device, for this tutorial i am using Es-file explorer.
Open es-file explorer and navigate to Whatsapp folder on your phone .
Now create a file named .nomedia . For this click on "+" button which is found left side below and select new file and name it as .nomedia and save.
Now open your gallery .Your Whatsapp photos and videos are now invisible in gallery.
If you want to show your whatsapp media in gallery you have to delete the .nomedia file from whatsapp directory. But if you go to the whats app directory you will not find any .nomedia file because the file is hidden . To show up the file follow the below screen shots.
Thats it you are done.
Keep visiting my blog for new tips and tricks ..
If you have any doubts regarding the process post in the comments . i will answer your questions...
Hello fiends this is another trick on android on rooting. This is my 4th android rooting guide for my android fans . Samsung galaxy grand and grand 2 is a popular android phone because it is in budget and high performance phone.
You don’t believe on me when I said that this rooting guide take only 5 min. But this is true and i told you that this rooting process test on my friends Grand 2. So continue reading my step by step guide how to root a Samsung galaxy grand 2.
DO This Before Starting Process:
Before starting process make sure you have charged your mobile battery 70%.
This rooting process works only grand 2 (SM-G7102), check about device and then do this process.
Check your PC you have installed Samsung USB driver if you don’t have click on itSamsung USB Driver.
Enable USB Debugging From your developer options
Take backup of your device to be safe
Note: if you install kies in your PC then skip to download USB driver
Before starting rooting process please download above file and extract all files also.
Now power of you device and restart it in download mode. Hold your device Volume Down+ menu + power button simultaneously and your device will be starting in download mode now. Now you can see the warning massage now click volume up button.
Now connect your device with your pc by USB cable and run odin in your computer.
Now wait for second because Odin detecting your device after detecting you can see ID:COM box color change into blue.
Now click on PDA button and select room extracted file.
Now after doing this click on start button to start process and wait for a minute. After completing process Odin give you massage and device reboot automatically.
Now your device rooted and enjoy your rooted Samsung galaxy grand 2. After rooting you install many apps.
Final Words!
This is my easy guide for my fans who want to how to root a Samsung galaxy grand 2. I got many mails in my inbox and i made this article for you. i m very happy when i made new tricks for you
If you like my article please subscribe our newsletter and get more awesome computer tricks and tips
If you have any quarry related this article comment below and I resolve it very soon.


 . Because everyone wants free stuff I also like free software and key to use full version of software and operating system. If you have any query or problem comment below and I will help you very soon. Thanks for visiting


